Hey there, let’s cut to the chase – if you’re reading this, odds are you’ve either fumbled an EPDM O-Ring installation so bad it split mid-fit, watched one fail prematurely because you “winged” the process, or you’re just here to make sure you don’t end up with a leaking, overstretched mess costing your team (or your clients) time and money. I’m Jake, been running this EPDM O-Ring supply shop for 12 years, and I’ve seen every mistake under the sun – from guys using screwdrivers to jam O-Rings into grooves to skipping tiny pre-install checks that turn a simple seal into a $10k+ shutdown. Today I’m breaking down exactly how to install these things right, no fancy jargon, no overcomplicated steps – just the stuff that actually works, straight from a supplier who cares if your O-Rings last 5 years or 5 minutes. EPDM O Ring
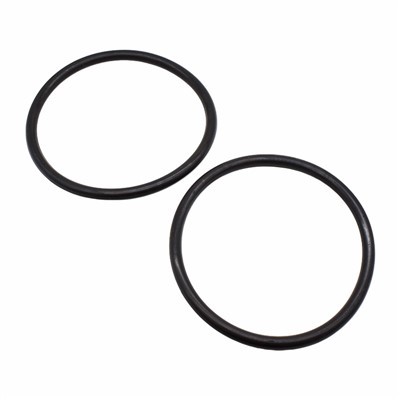
First off, let’s get one thing straight: EPDM O-Rings aren’t your average rubber band. EPDM (ethylene propylene diene monomer) is a weirdly versatile stuff – great for hot and cold environments, chemicals that would eat through nitrile, weather resistance, all that. But it’s also soft, prone to nicks, and stretches way too far if you rush it. I’ve sent O-Rings to clients that are cut from the same exact batch, and some install them properly and they hold up for 3 years on a water pump, while others install them wrong and they blow at the first pressure test. The difference isn’t the O-Ring – it’s the install.
Let’s start with prep, because this is the step everyone skips and pays for later. I don’t care if you’re grabbing a new O-Ring straight out of my box (I package all my EPDM O-Rings in sealed plastic to keep them clean, by the way – that’s a small thing we do right), you need to check three things before you even touch the groove. First, inspect the O-Ring itself. Run it gently between your thumb and index finger (no pinching hard) and look for tiny nicks, mold flashes, or even a twist in the ring. I’ve had new O-Rings come out of the packaging with a little cut from the cutting process – that’s a reject, period. Don’t waste time installing a ring that’s already damaged. Second, check the groove it’s going into. Grooves get burrs from machining, dirt, old seal gunk if you’re replacing, or even tiny metal shavings. Take a clean rag (lint-free, important – a cotton rag might leave fuzz that causes leaks) and wipe the groove out, then run your finger along the walls and bottom to feel for sharp edges. If you find a burr, a quick swipe with a 600-grit emery cloth is all you need to smooth it down. Third, confirm the size. I can’t tell you how many times a guy has come back saying “your O-Ring is too big!” only to realize he grabbed the wrong cross-section or inner diameter for his groove. Double-check the specs: inner diameter, cross-section width, and make sure the groove is cut to match. EPDM stretches about 20% max, so if your O-Ring is 2mm too big, you’re not stretching it – you’re overstretching it, and it’ll fail fast.
Next, lubrication. Here’s another common mistake: people either use no lube at all (so the O-Ring snags and tears) or the wrong lube, which eats through EPDM. I’ve seen guys use generic grease or even motor oil on EPDM O-Rings, and that’s a one-way ticket to a failed seal. EPDM is compatible with silicone-based lubricants, petroleum jelly (wait, really? But only if it’s pure, no additives), or even water for low-pressure, water-based applications. Avoid anything with petroleum distillates, hydrocarbon-based greases, or oils – that breaks down the EPDM’s molecular structure, making it hard and brittle over time. A tiny dab of lube is all you need, don’t slather it on. Too much lube can get into fluid systems and cause contamination, too – not ideal for things like food or pharma equipment.
Now, the actual installation. This is where most people mess up, especially when it’s going over a shaft or into a housing. First, never use sharp tools – screwdrivers, picks, knives, whatever. I’ve watched a guy use a flathead screwdriver to pry an O-Ring into a housing, and he nicked it so bad it failed 2 days later. If you’re working with a small, tight groove, use your fingers (washed, no dirt on them) or an O-Ring installation tool. Those are cheap, made of soft plastic or nylon, so they won’t scratch the O-Ring or the parts. For larger O-Rings, maybe on a hydraulic cylinder or a big pump, you can even use a plastic tube or a smooth dowel to guide it. Here’s the key rule: stretch the O-Ring evenly, not just on one side. If you pull one part way too tight while leaving the rest loose, that spot will get overstretched and fail. For O-Rings going into a shaft: start with one side of the ring, and gently work it around the shaft, pressing small sections at a time into the groove. For O-Rings going into a housing: same thing, start with one side, and work it evenly around the housing bore, pressing sections into the groove until it’s fully seated. Wait, and if you’re installing an O-Ring on a joint that has edges, like a stepped shaft, make sure you chamfer the edge. A 45-degree chamfer on the sharp edge will keep the O-Ring from catching. If there’s no chamfer, you can use a piece of emery cloth to sand a tiny bevel – takes 10 seconds, prevents tears.
Another thing: O-Ring twist. That’s a huge cause of leaks, especially in rotary applications like pumps or motors. Twist happens when you install the O-Ring at an angle, so when the parts move, it spins and seals wrong. How do you avoid that? Line up the O-Ring’s joint (wait, EPDM O-Rings are usually molded, right? No open joints) – wait, molded ones are seamless, so make sure when you seat it, it’s sitting flat in the groove, no part sticking up at an angle. If you’re working on a rotating part, test by hand turning the shaft after installation – it should spin smoothly, no catch from a twisted O-Ring. If it does catch, take it out and re-seat it, no exceptions.
Now, post-install checks. You don’t just slap the O-Ring in and call it good. First, make sure it’s fully seated in the groove. Run your finger gently around the entire circumference of the O-Ring – it should sit evenly, no bumps or gaps, no part sticking out further than the groove’s surface. If it’s sitting too high, that’ll cause extra friction and wear, and if it’s too low, it won’t seal right. Second, check for any nicks or damage after installation. Even if you checked the O-Ring before, a tiny snags during install can leave a mark. Hold it up to a light, run your finger over it again, make sure there’s no cuts that would leak. Third, if it’s a pressure application, do a low-pressure test first before putting it into full service. I always tell clients to test at 10% of their maximum pressure to catch leaks early – if it holds there, you can safely ramp up the pressure. No need to blast it at full force and watch it fail under pressure, that’s just wasteful.
Wait, let’s talk about common scenarios, because not all installs are the same. Like, if you’re replacing an old O-Ring, don’t just pull it out and jam the new one in. Clean the groove thoroughly, check for wear on the mating parts (shafts can get scored, which will damage new O-Rings), and match the new O-Ring exactly to the old one. If the old one was size 2mm cross-section, don’t use 1.8mm – that’ll leave a gap. For outdoor applications, like a gate valve or an outdoor pump, make sure the EPDM is rated for UV exposure? Wait, most standard EPDM is, but if it’s a super harsh outdoor environment, maybe go for a compound we offer that’s UV-stabilized – that’s a quick call you can make before you buy. For high-temperature applications, EPDM can handle up to around 150°C, so make sure you’re not using it on something that hits higher than that – we have other compounds for higher temps, just ask.
Let me share a quick horror story to drive this home. A few months back, a regular client of mine (he’s a water treatment plant guy, big project) came to me panicking. He had 20 new EPDM O-Rings I’d supplied, and his install team had nicked half of them with screwdrivers, so they were getting leaks on their new filter housings. We ended up overnighting a fresh batch, but he lost 2 days of production, cost him thousands in downtime, all because his team skipped the simple install steps I just laid out. That’s the stuff I hate seeing – not because it’s lost sales, but because guys waste money and time when it’s totally avoidable.
A few quick pro tips from 12 years in the game: 1. Always keep extra EPDM O-Rings clean. Store them in a cool, dry place, away from direct sunlight and chemicals, don’t leave them out on a workbench where they can get covered in dirt or oil. 2. Never stretch an EPDM O-Ring more than 20% of its inner diameter. If your groove is too big, don’t force a smaller O-Ring – that’s a surefire way to overstretch and break it. 3. If you’re working on a large project, order a test O-Ring first. Install one, check how it fits, make sure it works for your groove, before you do all the rest. Saves way more time than installing 100 wrong O-Rings.
Look, I get it – installing an O-Ring seems basic, like any dummy can do it. But I’ve seen too many dummies mess it up. EPDM is a great material, but it’s only as good as how you install it. Skip the shortcuts, do the prep, use the right tools, and you’ll have seals that last for years, not weeks.
If you’ve got questions about your specific application, need to confirm the right EPDM compound for your needs, or want to place an order, just reach out. I’m here to make sure you don’t make the same mistakes I’ve seen hundreds of other guys make. No pushy sales stuff, just straight answers and quality EPDM O-Rings that work when you install them right.
FKM O Ring References:
- Society of Automotive Engineers (SAE) Aerospace Standard AS5127/1 – Standard Specification for Rubber O-Rings
- EPDM Materials Selection Guide, ASTM International, 2021
- O-Ring Installation Best Practices, Fluid Power Society, 2022
Haining Chaoyue Seals Co., Ltd.
As one of the most professional epdm o ring manufacturers and suppliers in China, we offer a wide range of products with superior quality. Please feel free to wholesale high quality epdm o ring made in China here from our factory. Also, custom service is available.
Address: Building 9, 158 Lianhong Road, Yuanhua Town, Jiaxing, Zhejiang, China.
E-mail: chaoyue@cyseals.com
WebSite: https://www.hncyseal.com/
